Every Halloween, costume party, or themed event offers a new opportunity to bring beloved characters to life, and few are as iconic as Little Red Riding Hood. The story has captivated hearts for generations, combining themes of innocence, adventure, and bravery. Making your own red riding hood DIY costume not only allows you to embody the character but also to express your creativity and personal style. This comprehensive guide will provide everything you need to know, from gathering materials to handcrafting each layer of your costume. You will also discover tips on accessorizing, styling your hair and makeup, and showcasing your creation. By the end, you’ll feel empowered and confident as you step out in your unique interpretation of this classic fairy tale character!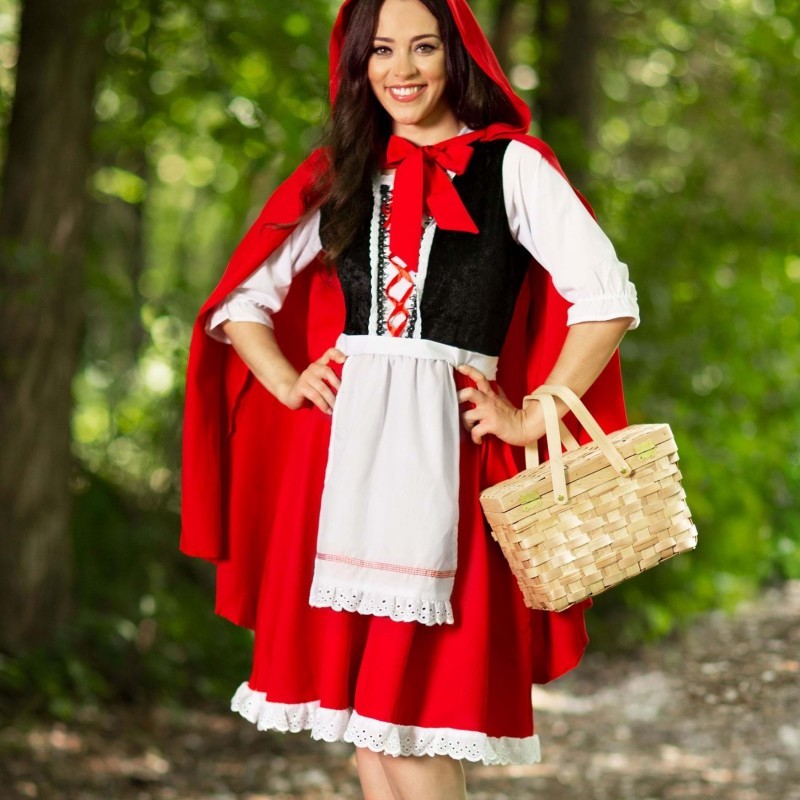
Contents
- 1 Understanding Little Red Riding Hood: A Brief Overview
- 2 Gathering Materials for Your Red Riding Hood DIY Costume
- 3 Crafting the Iconic Cloak
- 4 Designing the Underlying Dress
- 5 Accessorizing Your Red Riding Hood Costume
- 6 Styling Hair and Makeup to Enhance Your Costume
- 7 Tips for a Successful Red Riding Hood DIY Costume Experience
- 8 Showcasing Your Red Riding Hood Costume
- 9 Conclusion: Embracing the Spirit of Little Red Riding Hood
Understanding Little Red Riding Hood: A Brief Overview
Before diving into the practical aspects of creating your red riding hood DIY costume, it’s valuable to explore the character’s background and symbolism. Little Red Riding Hood is not just a story about a young girl and a wolf; it also embodies important themes that resonate with audiences, especially children. The character represents the journey from childhood to adulthood, confronting danger, and the importance of listening to one’s instincts.
In visual storytelling, the red cloak serves as a potent symbol of danger and courage. The color red is often associated with love, passion, and danger, elements that are evident in the story. As you craft your costume, keeping these themes in mind will help you design something not just visually stunning but also meaningful. Consider what aspects of the character resonate with you personally. This connection can guide your choices, from the type of fabric used to the accessories you choose.
Gathering Materials for Your Red Riding Hood DIY Costume
Creating the perfect red riding hood DIY costume requires careful planning and material selection. Here’s a comprehensive list of what you’ll need to gather before you begin crafting:
- Fabric: The most crucial element is a vibrant red fabric for the cloak. You have several options, including cotton, velvet, or fleece, each offering a different texture and drape. For the dress, consider using a lighter fabric that complements the cloak, such as white or soft floral patterns.
- Patterns: Search for patterns for a simple dress and a hooded cloak. If you’re comfortable sewing, you can also create your own patterns based on your design preferences.
- Sewing Supplies: Ensure you have essential sewing tools at hand, including scissors, thread, needles, pins, and a sewing machine if possible. If you prefer to avoid sewing, fabric glue can be a helpful alternative for attaching pieces.
- Accessories: Gather props that enhance the costume. A small wicker basket is essential for carrying faux treats. You might also consider flowers or other woodland-themed items.
- Embroidery or Decor: Consider adding embellishments like lace, fabric paint, or rhinestones to give your costume a unique flair.
Taking the time to gather quality materials will significantly impact the final look of your red riding hood DIY costume, making the effort worthwhile.
Crafting the Iconic Cloak
The cloak is the heart of your red riding hood DIY costume, and it sets the tone for the entire outfit. Follow these steps to create an enchanting and comfortable cloak that embodies the spirit of the character:
- Cutting the Fabric: Start by measuring the length you want your cloak to be, typically extending from your shoulders to a few inches above the ground. Cut a rectangular shape from your red fabric, allowing enough material for the hood as well.
- Creating the Hood: For the hood, cut a large semicircle from the top of the remaining fabric. This semicircle will form the hood when attached to the neckline of your cloak.
- Sewing Technique: Fold and sew the edges of the cloak to prevent fraying. If necessary, use bias tape to finish the edges neatly. Then attach the semicircle to the rectangular piece, securing it along the neckline.
- Adding Fasteners: To keep the cloak in place, consider adding a clasp or button at the neckline. This will ensure that your cloak remains secure, adding both functionality and style.
- Final Touches: Embellish the cloak to showcase your personal touches. Whether adding lace around the edges or a few fabric flowers, these details can make your outfit truly unique.
By following these steps, you will create a beautiful cloak that serves as a stunning centerpiece for your red riding hood DIY costume.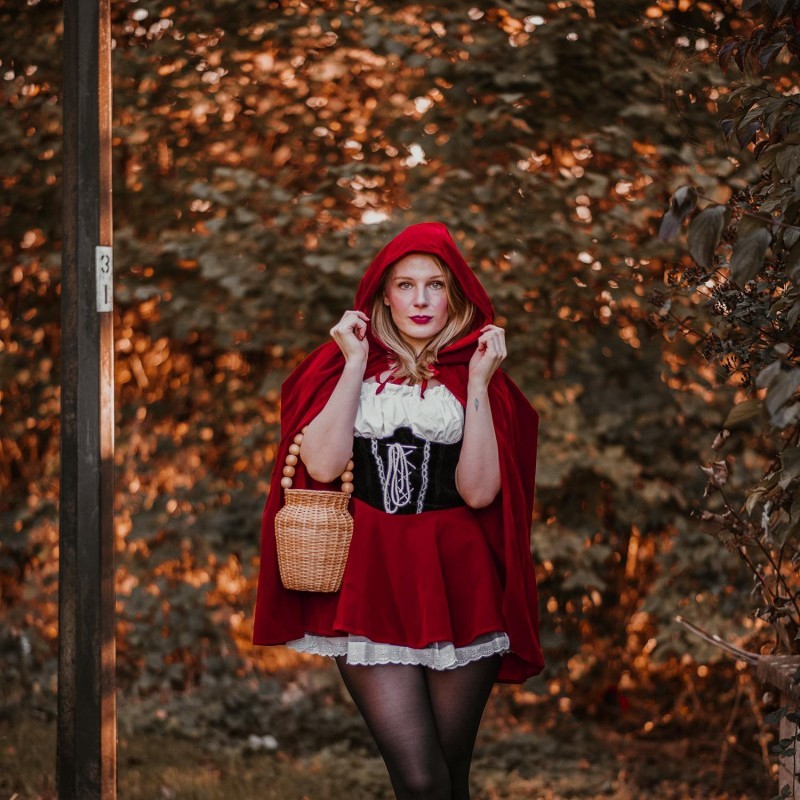
Designing the Underlying Dress
While the cloak is significant, the dress beneath also plays a crucial role in your costume. A simple yet elegant dress can perfectly complement the cloak. Here’s a step-by-step guide to crafting your underlying dress:
- Pattern Selection: Look for a dress pattern that aligns with the period feel of Little Red Riding Hood. A simple A-line dress or a summer sundress can work perfectly, allowing for comfort and movement.
- Fabric Choice: Choose a lighter fabric for the dress, such as white cotton or a soft floral print. This color contrast against the red cloak will help your ensemble stand out.
- Sewing Your Dress: Following your chosen pattern, cut the fabric carefully. Remember to leave space for seam allowances and hems.
- Constructing the Bodice and Skirt: Start by assembling the bodice of the dress, ensuring it fits comfortably. Attach a gathered skirt at the waist, allowing for volume and flow.
- Finishing Touches: Hem the edges of the dress and add any desired embellishments—this could be small ribbons, lace details, or fabric paint designs that reflect the whimsical nature of the character.
By completing these steps, your dress will serve as a graceful foundation for your red riding hood costume, emphasizing the character’s charm and innocence.
Accessorizing Your Red Riding Hood Costume
Accessories are essential in bringing your red riding hood DIY costume to life. They can elevate your outfit and help you embody the character fully. Here are some accessories you might consider:
- Basket: A woven basket is a must-have prop. Fill it with faux foods such as bread, fruit, or a small stuffed animal to reflect what Little Red Riding Hood carries in the story.
- Shoes: Choose comfortable footwear to complement the costume. Classic black flats or red shoes can be practical options that remain aligned with the theme. Remember, comfort is essential, especially if you plan to wear the costume for extended periods.
- Headpiece: While you can opt to leave your hair down, consider wearing a simple headband or floral crown to enhance the fairy-tale aspect. Alternatively, you could add a small red cap that fits into the overarching theme.
- Jewelry: Keep jewelry simple to reflect the character’s innocence. A small necklace or delicate earrings can add charm without overwhelming the look.
- Props: If you feel adventurous, you could also include additional props, such as a toy wolf or a storybook, to further immerse yourself in the character.
These accessories not only complete your overall look but also reflect the charm and narrative of Little Red Riding Hood, inviting onlookers into the story.
Styling Hair and Makeup to Enhance Your Costume
A well-crafted costume goes beyond clothing; it also encompasses how you style your hair and apply makeup. Here are some styling tips to help you embody Little Red Riding Hood fully:
- Hairstyle: For an authentic touch, consider styling your hair in loose waves or braids. This complements the fairy-tale aesthetic and adds a soft, romantic element to the overall look. If your hair is long enough, you can also wear it down and add a few flowers for an enchanting touch.
- Makeup Palette: Opt for a natural makeup look that enhances your features without overpowering them. Focus on soft blush, natural eyeshadow shades, and a bit of highlighter for a fresh-faced glow.
- Bold Lips: A classic red lipstick can mirror Little Red Riding Hood’s signature cloak and add a touch of elegance to your makeup.
- Simple Details: Consider adding face paint or shimmer to your cheeks for a whimsical finish. A subtle touch like this can elevate your look without too much effort.
By thoughtfully styling your hair and makeup, you’ll complete the transformation into Little Red Riding Hood, making your DIY costume even more compelling.
Tips for a Successful Red Riding Hood DIY Costume Experience
As you embark on your red riding hood DIY costume project, here are several tips to ensure success:
- Start Early: Begin your project well in advance, allowing ample time for crafting, adjustments, and any unexpected challenges you might face.
- Follow Your Design: Stick to your initial design as much as possible to avoid getting sidetracked. However, be flexible and willing to adjust as needed based on the materials you have.
- Practice Sewing Techniques: If you’re new to sewing or certain techniques, consider practicing on scrap fabric beforehand. This will help you feel more confident as you sew your actual costume.
- Seek Guidance: If you run into difficulties, don’t hesitate to seek help from friends, family, or online resources. There are countless tutorials and communities dedicated to costume making that can offer invaluable advice.
- Document the Process: Take photos along the way to document your progress. This not only helps you track your journey but will also allow you a chance to reflect on the effort you put into your creation.
Implementing these tips will help facilitate a smooth and enjoyable experience as you craft your red riding hood costume.
Showcasing Your Red Riding Hood Costume
Once you’ve put in the work to create your red riding hood DIY costume, it’s time to share your creation with others. Here are some ideas on how to showcase your effort:
- Costume Parties: Join Halloween parties, costume events, or themed gatherings where you can wear your red riding hood costume. Engaging with others in the spirit of fun and creativity will make your effort all the more rewarding.
- Social Media: Share your costume on social media platforms—document your crafting process, and feature your final look. Engaging with the online crafting community can connect you with others who share your passion.
- Photoshoots: Organize a beautiful photoshoot inspired by the fairy tale. Choose a scenic location, such as a forest, to capture stunning images that reflect the essence of Little Red Riding Hood.
- Community Events: Look for local fairs, plays, or themed events where you can wear your costume and connect with others who appreciate the arts of storytelling and creativity.
Sharing your costume inspires others and allows you to celebrate your hard work, creativity, and dedication while enjoying the company of fellow enthusiasts.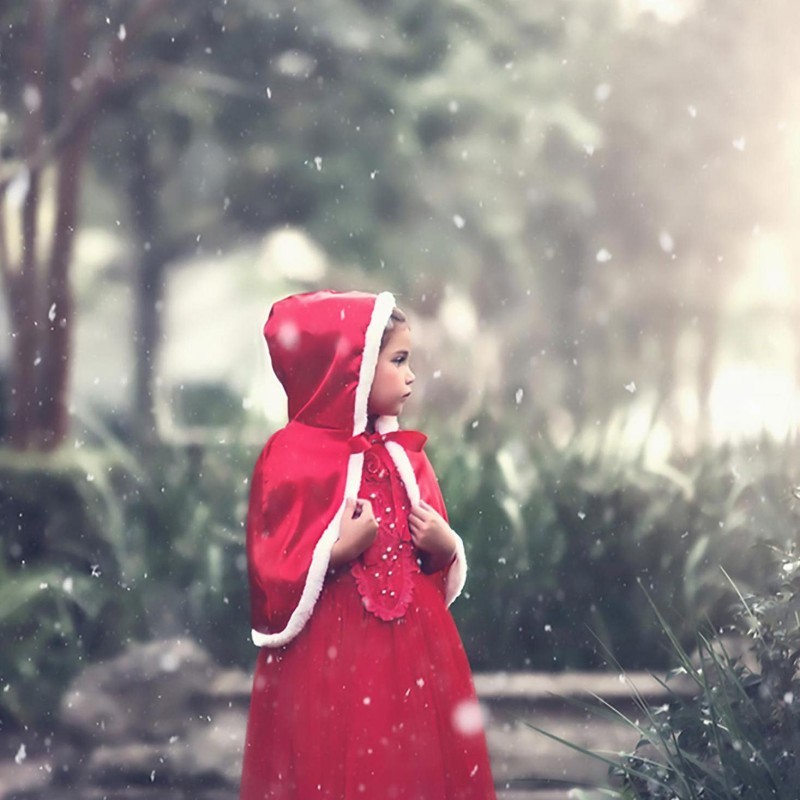
Conclusion: Embracing the Spirit of Little Red Riding Hood
Creating a red riding hood DIY costume is a magical journey that enables you to explore your creativity while connecting with an iconic character. From gathering materials to sewing and accessorizing, every step of the process allows for artistic expression and personal resonance. The message behind Little Red Riding Hood—courage, innocence, and awareness—can reflect your own values, making the project even more meaningful.
With your costume finished, you’re not only prepared for a fun event or celebration but also equipped with the confidence and joy of embracing your creativity. By understanding the character’s essence, gathering quality materials, and crafting each component with care, you’ve brought to life a piece of literary history in a way that uniquely expresses who you are. So step into your cloak, grab your basket, and venture forth into a world filled with imagination, adventure, and a touch of fairy-tale magic!