Contents
Introduction
The Coraline and Wybie costume theme captures the charm of the beloved animated film. With vibrant colors and quirky designs, these costumes are ideal for cosplay, themed parties, or Halloween. Both characters have unique looks that are fun and easy to recreate with the right materials and imagination. Whether you’re creating Coraline’s colorful style or Wybie’s eclectic outfit, these costumes are sure to stand out.
Overview of Coraline’s Iconic Look
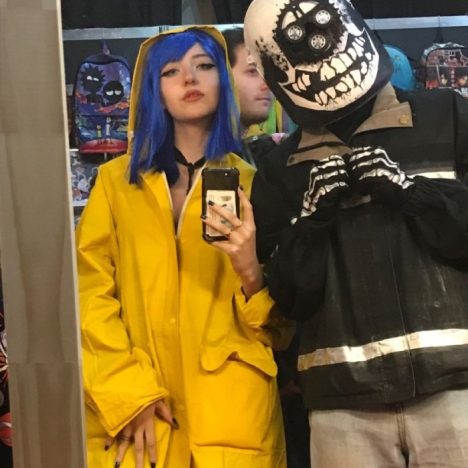
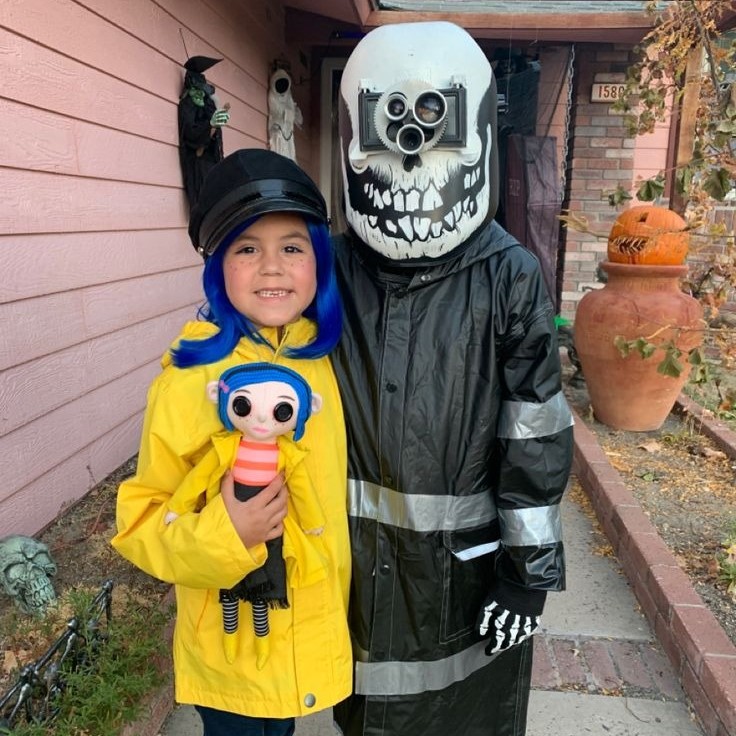
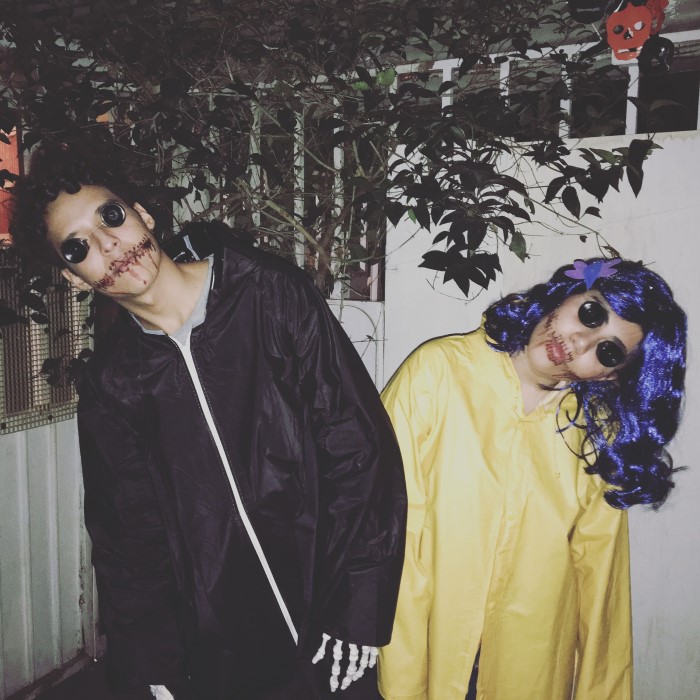
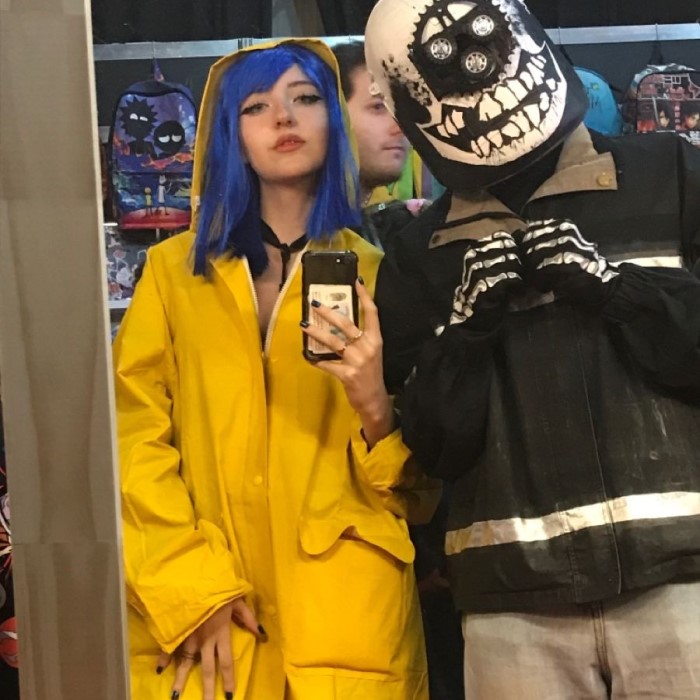
Coraline’s outfit is instantly recognizable with her distinctive yellow raincoat and blue hair. She often pairs her raincoat with blue jeans and bright red boots. Her dragonfly hair clip adds a whimsical touch to her overall look. This costume is not just bold but also simple to assemble. Pay attention to details like the star-patterned sweater and vivid wig, which bring Coraline’s character to life.
Unpacking Wybie’s Signature Style
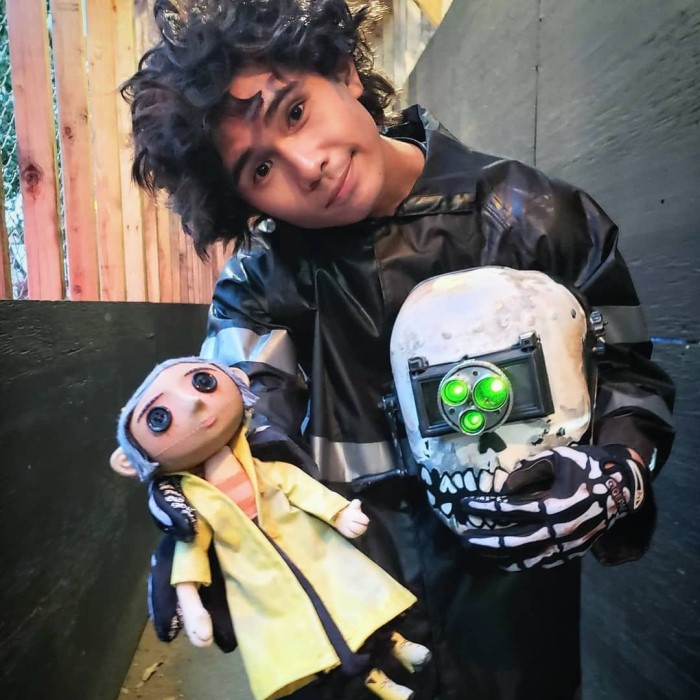
Wybie’s costume showcases his quirky personality with layered and textured elements. His outerwear usually features a dark, rugged jacket and cargo-style pants. Wybie’s gloves and helmet are critical to completing his ensemble. Replicating his iconic mask can also add a mysterious vibe to the costume. These elements combine to make Wybie’s costume practical, edgy, and full of character appeal.
Materials Needed for DIY Coraline Costume
Creating Coraline’s costume requires careful selection of fabrics and accessories. Her colorful look can be recreated using affordable and accessible materials. Start by focusing on the quality and texture of your materials to ensure accuracy.
Recommended Fabrics and Colors for Coraline Outfit
Coraline’s outfit stands out due to its vibrant textures and colors. Opt for fabrics that match her signature look:
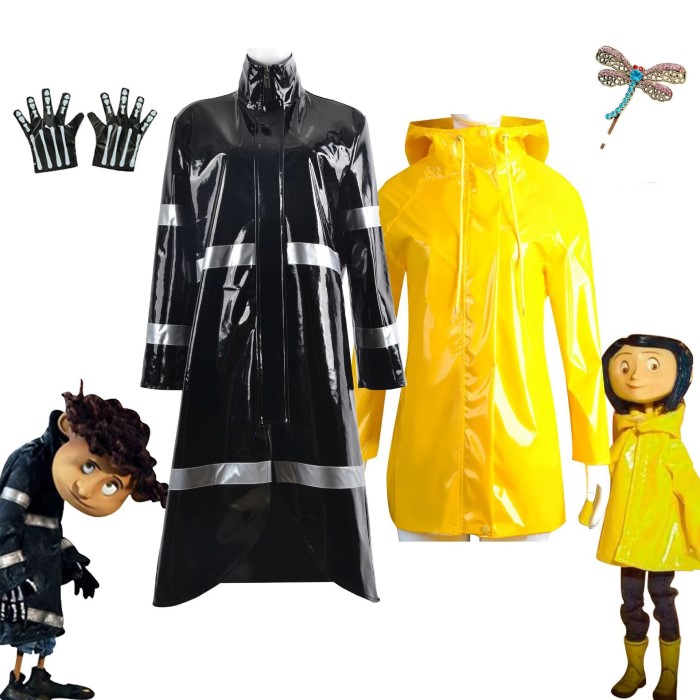
- Yellow Fabric: Use waterproof material for her iconic raincoat.
- Blue Denim: Select stretchable fabric for her jeans.
- Star-Patterned Sweater Material: Look for fabrics with star-like designs.
- Wig Material: Choose synthetic fibers dyed in blue for her wig.
Carefully stick to bright and bold colors for authenticity. Ensure the colors remain consistent throughout the costume.
Accessories: The Yellow Raincoat, Boots, and Dragonfly Hair Clip
Coraline’s accessories complete her outfit and give it character. Key accessories include:
Yellow Raincoat
- Material Selection: Choose a lightweight, waterproof fabric that will keep you dry without weighing you down.
- Style: Opt for a hooded design to protect against rain while adding to the character’s whimsical look.
- Color Consideration: Ensure the raincoat is a vibrant yellow, as this is a signature color for Coraline and helps you stand out.
- Fit and Comfort: Make sure the raincoat fits well and allows for easy movement, especially if you plan on wearing layers underneath.
Red Boots
- Type of Boots: Look for knee-high rubber boots that are both stylish and functional, providing good coverage against the elements.
- Color: Opt for a bright red color to add a fun contrast to the yellow raincoat, mirroring Coraline’s adventurous spirit.
- Comfort: Choose boots with a comfortable lining and sole to ensure they are wearable for extended periods, especially during events or parties.
- Design Features: Consider boots with unique designs or patterns that can enhance the overall aesthetic of your costume and draw attention.
Dragonfly Hair Clip
- Finding Clips: Search for playful hair clips that feature dragonfly designs, which can easily complement the costume.
- Crafting Your Own: If you want a custom look, consider crafting your own dragonfly clip using wire and beads for a personal touch.
- Color Scheme: Choose colors for the clip that harmonize with your costume, making sure it pops against your hair or raincoat.
- Attachment Method: Ensure that the clip securely holds your hair in place, allowing for movement without slipping throughout the day.
Detailed accessories make coraline and wybie costume truly recognizable. Focus on adding unique elements like functional pockets on the raincoat and carefully selected clips to enhance originality.
Step-by-Step Guide to Crafting Coraline Costume
Creating Coraline Outfit from Scratch
Begin by gathering all the essential materials for the coraline and wybie costume. Start with a lightweight hooded raincoat in vibrant yellow. Ensure it fits comfortably and matches Coraline’s signature look. Choose blue denim for her jeans, preferably with a stretchable fabric for easy movement.
Next, find a star-patterned sweater or craft one yourself using fabric paint and stencils. Use synthetic fibers dyed in bright blue for the wig. Trim it into Coraline’s trademark bob hairstyle for accuracy.
Pair the outfit with bright red knee-high rubber boots to add a bold contrast. Lastly, create or purchase a dragonfly-shaped hair clip. You can use colorful beads and wire to craft it. Assemble these elements carefully to recreate Coraline’s iconic look.
Tips for Styling Coraline’s Wig
Styling Coraline’s wig is essential to complete the costume. Begin by selecting a wig with synthetic blue fibers. Ensure the wig falls slightly below the chin to match Coraline’s bob hairstyle.
Trim the wig if necessary, focusing on creating a rounded and neat look. Comb the fibers down using a wig brush to avoid tangles. Add volume to the top of the wig for a more natural appearance.
Consider using hair clips or spray to keep the wig in place. Secure the dragonfly clip on the wig to mimic Coraline’s playful hair accessory. These steps will help achieve a polished and accurate hairstyle.
Materials Needed for DIY Wybie Costume
Creating a realistic Wybie costume starts with gathering the right materials. Focus on his layered, textured coraline and wybie costume. Each piece of his outfit plays a key role in recreating his quirky style.
Fabrics and Key Pieces for Wybie?s Outerwear
Wybie’s outerwear is defined by rugged and durable elements. Consider the following materials:
- Dark Jacket Fabric: Select thick, weathered material for a sturdy jacket appearance.
- Cargo Pants Material: Go for durable fabrics like cotton canvas for a practical feel.
- Layered Textures: Combine fabrics to add dimension to Wybie’s jacket and pants.
For colors, stick to dark and earthy tones like black, gray, or brown. Ensure the fabrics look slightly distressed for authenticity.
Unique Items: Wybie Mask and Gloves
Two unique items make Wybie’s costume instantly recognizable: his mask and gloves. Here’s how to recreate them:
- Wybie’s Mask: Use craft foam or molded plastic to create the mask’s shape. Paint it with muted colors.
- Gloves: Choose dark gloves with a simple design. Lightweight leather or synthetic material works best.
These elements are essential for adding Wybie’s signature mysterious vibe to the costume. Don’t forget to pay attention to details, like ensuring the mask fits comfortably and complementing the gloves with the rest of the outfit.
Crafting Wybie Costume
Wybie’s costume is a mix of rugged and quirky. Focus on assembling his signature layered look.
How to Assemble Wybie Jacket and Pants
- Jacket: Start with a dark fabric like cotton or canvas. Look for a rugged design. Add layers by stitching patches or overlays. Distress the material slightly to create an aged appearance.
- Pants: Choose cargo-style pants. Select durable fabrics like cotton canvas in earthy tones such as gray or brown. Ensure the pants have functional pockets to emulate Wybie’s practical style.
- Fit and Finish: Make sure the jacket and pants fit well but allow easy movement. Pay attention to texture for depth and character. Layering and weathering are essential for authenticity.
Adding the Finishing Touches: Wybie Helmet and Shoes
- Helmet: Find a safety helmet or craft one using a base like hard plastic. Paint it in muted, neutral colors like gray or tan. Add subtle details such as faux screws or weathering effects.
- Shoes: Use dark, sturdy boots to complete Wybie’s outdoor look. Combat or work boots work best. Choose slightly worn ones for a more authentic feel.
- Details: Tie everything together by making subtle customizations. Add dirt marks or scuffs on the shoes and helmet. These finishing touches bring Wybie?s distinctive character to life.
Achieve Wybie’s full quirkiness with attention to these details and accessories.
Customization and Personalization Ideas
Adding a personal touch can make your Coraline and Wybie costumes unique and memorable. Adjusting sizes, adding creative elements, or enhancing details can elevate their look. These customizations ensure the costumes suit different individuals and occasions.
Tailoring the Costumes for Different Sizes and Ages
- Adjust the Fit: Modify the size to match the wearer’s height and body shape.
- Flexible Fabrics: Use stretchable materials for comfort, especially for kids.
- Simplify Designs for Kids: Remove small or delicate accessories for easier wear.
- Enhance for Adults: Add intricate patterns or extra layers for a sophisticated look.
- Safety First: Ensure all accessories, like clips and masks, are age-appropriate and safe.
Add-ons for an Extra Touch of Creativity
- Glow-in-the-Dark Features: Paint accents on Wybie’s helmet or Coraline’s raincoat.
- Props: Add items like Coraline’s doll or Wybie’s motorcycle gloves.
- Extra Details: Embellish Coraline’s sweater with extra stitching or Wybie’s mask with designs.
- Custom Colors: Use alternate tones for a fresh interpretation of their outfits.
- Personal Themes: Incorporate personal symbols or badges to blend the costume with your style.
These customization ideas make your Coraline and Wybie costumes stand out while reflecting your creativity.
Where to Showcase Your Coraline and Wybie Costumes
Perfect Occasions for Wearing Your Costumes
Coraline and Wybie costumes are versatile for many events. Here are some great occasions:
- Halloween Parties: Perfect for spooky yet fun gatherings.
- Cosplay Conventions: Showcase your craftsmanship among fellow fans.
- Movie-Themed Parties: Impress the crowd with authentic looks.
- School Events: Great for dress-up days or themed presentations.
- Community Festivals: Stand out during parades or costume contests.
These events offer the perfect platform to display your creativity and attention to detail.
Photo Shoot Tips for Capturing the Perfect Look
A planned photo shoot can make your Coraline and Wybie costume shine. Follow these tips:
Choose a Scenic Location
- Select Suitable Landscapes: Look for locations that embody the film’s blend of darkness and whimsy, such as a dense forest or a decaying urban environment.
- Nature vs. Urban: Consider both natural settings like twisted trees or foggy pathways, as well as historical sites with worn-out buildings to create a contrasting backdrop.
- Mood and Inspiration: Ensure that the chosen location elicits a sense of mystery and adventure, much like the environments portrayed in the movie.
- Safety Considerations: Make sure the location is safe for all participants, considering factors like accessibility and any potential hazards in the area.
Use Proper Lighting
- Experiment with Light: Use dim or moody lighting to cast interesting shadows that can evoke the eerie ambiance of the film.
- Natural Light vs. Artificial Sources: If shooting outdoors, consider the time of day; dawn or dusk can provide soft, flattering light. Alternatively, use artificial lights with filters to create a similar effect.
- Highlight Specific Features: Focus the lighting on key elements, like the characters’ faces or particular props, to draw attention to essential details.
- Create Depth: Utilize layered lighting techniques to add dimension to your photos, enhancing the scene’s overall depth and intrigue.
Focus on Props
- Incorporate Key Items: Use iconic props from the film, such as Coraline’s doll or Wybie’s motorcycle gloves, to boost the authenticity of your costume.
- DIY Possibilities: If certain props are hard to find, consider making your own versions using available materials for a personalized touch.
- Props’ Role in Storytelling: Strategically position props to reflect the characters’ personalities and backstories, adding a narrative element to your photos.
- Detailing Props: Pay attention to the small details of your props, like the textures and colors, to ensure they are accurate representations of the original items.
Position Carefully
- Choose Dynamic Stances: Experiment with playful or heroic poses that capture the essence of Coraline and Wybie’s adventurous spirits.
- Direction of Gaze: Position the characters to look off-camera or engage with their surroundings to create a sense of action and narrative.
- Facial Expressions: Encourage expressions that reflect the characters’ unique personalities—whether it’s curiosity, determination, or mirth—to bring your scenes to life.
- Group Dynamics: If photographing multiple characters, consider how their positions relate, creating a natural flow in the composition while highlighting their relationships.
Edit Photos
- Highlight Iconic Colors: During the editing process, emphasize colors like yellow and blue to reflect Coraline’s signature raincoat and hair, creating a vibrant contrast.
- Adjust Saturation: Use software to increase saturation for specific colors without compromising the overall integrity of the image.
- Apply Filters Thoughtfully: Consider using filters that enhance the mood, but be careful to maintain the characters’ recognizable features and colors.
- Final Touches: After focusing on color enhancement, review the overall composition to ensure all elements come together cohesively, creating a final product that resonates with the film’s aesthetic.
Combining creativity and attention to detail ensures your coraline and wybie costume stand out in memorable photographs.
Conclusion
Creating your own coraline and wybie costume is not only an enjoyable hobby but also a way to connect with your favorite characters. Taking the time to understand the nuances of these beloved figures enhances the overall design. Whether you’re making Coraline’s striking yellow raincoat or Wybie’s trendy cap, every detail contributes to the vibrancy of the characters.
Embrace the challenge and joy of DIY costume-making as you bring these characters to life. Remember, standing out is about confidence and creativity, as much as it is about the final product. With these tips and ideas, you’re well on your way to a captivating costume that will leave a lasting impression. So gather your materials, unleash your imagination, and let your DIY creativity shine!