Contents
Introduction: The Importance
As Halloween approaches, many people start thinking about their costumes and the finishing touches that can elevate their look. One of the most effective ways to make a costume stand out is through easy face paint. Easy face paint for Halloween allows you to enhance your overall appearance without the need for extensive makeup skills or complicated techniques. Whether you’re a parent looking to paint your child’s face or an adult wanting to create a stunning, yet simple look, this article will provide you with stylish, straightforward tips to make your Halloween memorable.
Choosing the Right Face Paint
When embarking on your Halloween face painting journey, the first step is choosing the right products. Here are some important factors to consider:
1. Non-Toxic and Skin-Safe Products
Selecting non-toxic face paint is essential to ensure safety, particularly for sensitive skin. Always opt for products labeled as skin-safe.
- Water-Based Face Paints: These are easy to use and remove, making them ideal for Halloween. They provide bright colors and blend easily.
- Cream-Based Face Paints: Cream paints offer excellent coverage. They may be slightly harder to clean but can provide vibrant colors.
2. Hypoallergenic Options
If you or your child have sensitive skin, choosing hypoallergenic face paints is a wise decision. These products reduce the risk of irritations or rashes. Always check the ingredient list.
- Avoiding Allergens: Evaluate the ingredients in your face paint. Scour for common allergens, especially if you have a history of skin sensitivity.
- Test Before Use: Always perform a patch test to ensure no adverse reactions occur when using the face paint for the first time.
3. Quality Matters
Investing in quality face paints may save you time and effort in the long run. Higher-quality paints often have richer pigments and better staying power.
- Brand Recommendations: Look for reputable brands known for their face paints. Researching reviews can help you identify top-quality options that meet your needs.

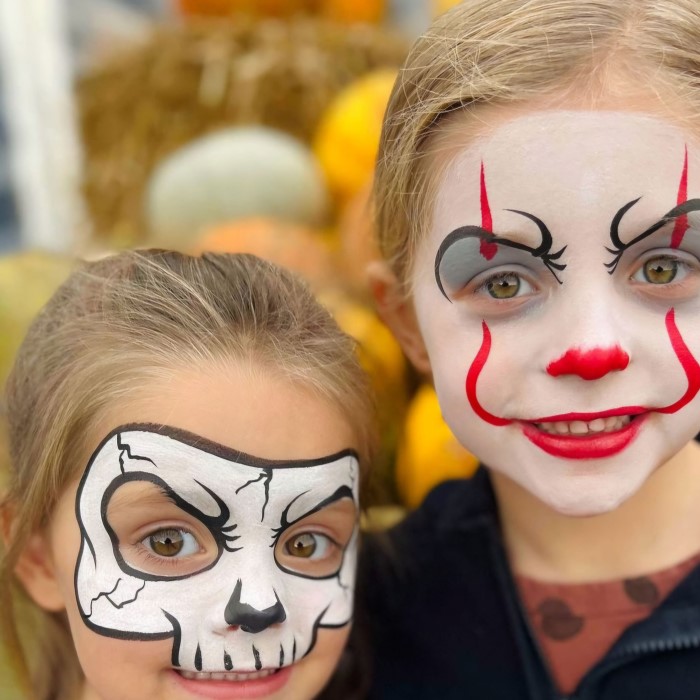
Easy, Stylish Face Paint Ideas for Halloween
Now that you know how to choose the right face paint, let’s explore some easy face paint for halloween ideas that require minimal effort but make a big impact.
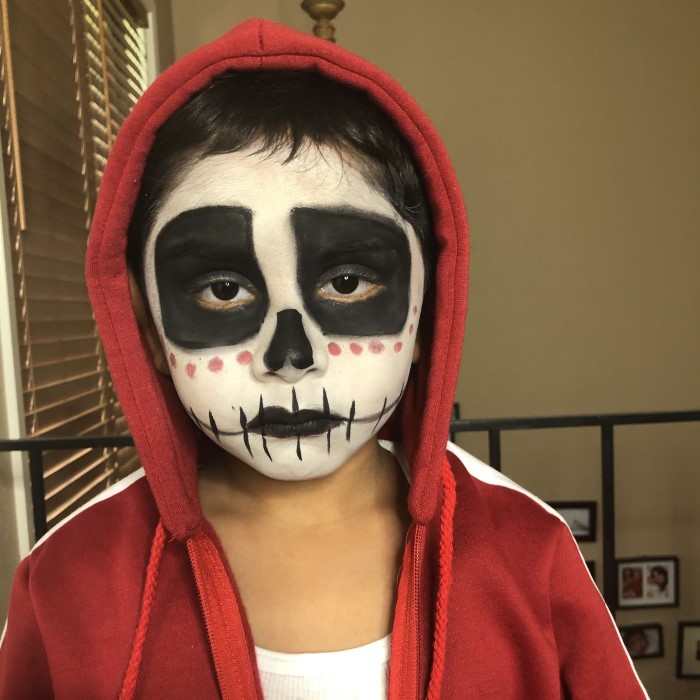
1. Classic Skull Design
A skull is a Halloween classic that is both spooky and stylish. Here’s how to achieve this look easily:
Base Coat
To achieve a striking skull look with your face paint, starting with a solid base coat is essential. Here are some steps and tips for applying the base coat effectively:
- Choosing the Right Product: Use a high-quality, skin-safe white face paint. Water-based or cream-based paints are great options for achieving an even finish. Make sure to avoid oily or greasy paints, which may not layer well.
- Preparation: Clean your face thoroughly before application. This ensures that the paint adheres properly. Moisturize your skin lightly to create a smooth canvas but allow it to absorb completely.
- Application Technique: Use a broad brush or a sponge for even coverage. Dampen the sponge slightly with water, which helps the paint go on smoother. Apply the white base coat all over your face, ensuring even distribution that masks your natural skin tone.
- Layering: Depending on the opacity of the paint you’re using, you may need to apply multiple layers. Allow each layer to dry before adding another to prevent smudging. The final result should be a bright, uniform white that serves as the foundation for your skull design.
Eye Sockets
Creating deep-set eye sockets is crucial for achieving an authentic skull look. Here’s how to do this effectively:
- Choosing the Right Color: Use a quality black face paint specifically designed for the skin. Cream-based paints often provide better coverage for darker areas.
- Outline First: Using a fine brush, carefully outline the shape of the eye sockets. You can choose to make them larger for a more dramatic effect. Take your time to ensure symmetry and avoid mistakes.
- Fill In: Once you are satisfied with the outline, use the brush or a small sponge to fill in the eye sockets with black paint. Ensure you apply an even layer that covers the white base completely.
- Creating Depth: To enhance the skull effect, add shading around the edges of the eye sockets. You can use gray or dark brown to blend seamlessly into the black. This added detail gives a more three-dimensional look, making the eyes appear sunken and ghastly.
Teeth and Nose
Adding teeth and a nose is essential to completing the skull look. Here are the steps to achieve this:
- Designing the Teeth: Use the same black face paint to create exaggerated, bold teeth. For a classic skull appearance, draw a series of pointed shapes along the jawline. Instead of realistic teeth, opting for a more cartoonish style can enhance the overall effect.
- Placement and Alignment: Draw the teeth in a straight line across the mouth. Ensure there’s space between each tooth for a more distinguished and striking appearance.
- Highlighting: After the initial black layer is dry, you can accentuate the teeth by adding white highlights. This will add dimension and make the teeth pop against the black background. Use a fine brush to add small white strokes on the edges of each tooth.
- Creating the Nose: For the classic skull nose, draw a small triangular shape at the center of your face just above your upper lip. Use the black paint to fill in this shape completely. You can make the triangle sharper or more rounded based on the look you want to achieve.
- Finishing Touches: Once the nose and teeth are applied, check the balance of the colors. You might want to add a little bit of shading around the nose area to enhance the definition and give depth to the features.
2. Mysterious Cat
The cat face is another fun and easy option that can be achieved quickly.
- Base Color: Use black or gray for the base. Cover your entire face or focus on the upper portion, depending on preference.
- Whiskers and Features: Use white paint to create whiskers and a small triangle on the nose. Add details to the eyes, like eyeliner, to make them look more feline.
- Ears and Fur Accents: Consider completing the look with ears made from paper or felt. Adding fur accents using lighter shades will give your look additional texture.
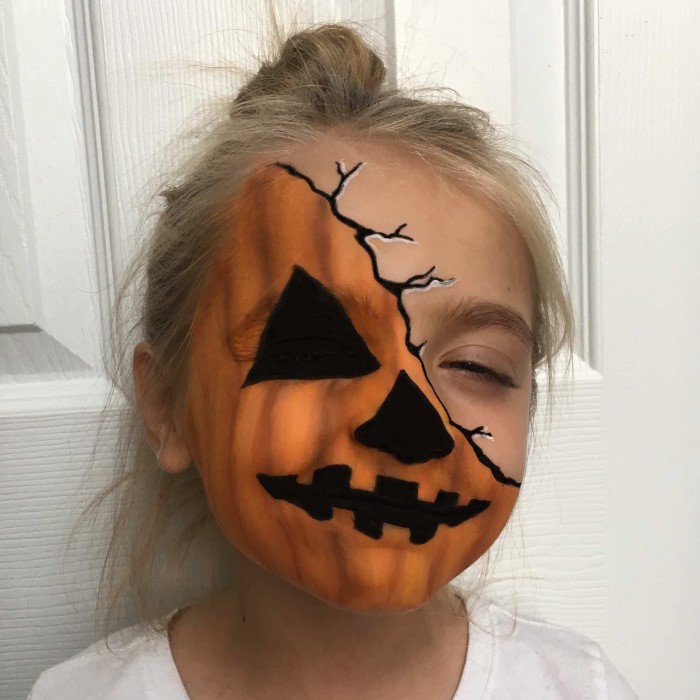
3. Cute Pumpkin Face
A cheerful pumpkin face is perfect for those who want to embrace the festive spirit without being too scary.
- Orange Base: Apply orange face paint evenly over your face. Ensure good coverage for a vibrant look.
- Eyes and Smile: Use black paint to create cartoonish eyes and a wide, happy smile. You can even add some green around the mouth for a fun twist.
- Green Stem: Add a green triangle at the forehead or on the top of your head to represent a pumpkin stem, giving the finished design a complete look.
Techniques for Application
While the design you choose is essential, the techniques used during application influence how the final look turns out. Here are some valuable tips:
1. Skin Preparation
Before applying face paint, ensure your skin is clean and dry to achieve a flawless finish.
- Clean and Moisturize: Start with facial cleansing, followed by a light moisturizer. This helps the paint adhere better.
- Using a Primer: If available, apply a primer specifically designed for face paint. This will enhance longevity and prevent smudging.
2. Using Quality Brushes and Sponges
Quality tools can make a significant difference in application.
- Brush Types: Use different sizes for detail work and broader areas. Flat brushes work well for bases, while finer brushes help with details.
- Sponges for Blending: Makeup sponges can help blend colors seamlessly, especially when creating gradients or soft edges.
3. Setting the Makeup
To ensure your face paint lasts throughout the evening, consider following up with a setting spray.
- Spray for Longevity: A makeup setting spray designed for face paint helps lock in your look and keep it from smudging.
- Touch-Up Kit: Carry a small touch-up kit, including a compact mirror and a travel-size paint or makeup pencil, to make any necessary adjustments throughout the night.
Frequently Asked Questions
What is the easiest Halloween makeup for beginners?
For beginners, simple designs like cat faces, pumpkins, and classic skulls serve as easy starting points. These looks require minimal skills yet achieve a great effect.
How to make face paint with only 3 ingredients?
You can create your own face paint using cornstarch, water, and food coloring. Mix equal parts cornstarch with water and add food coloring to achieve the desired shade.
How to make face paint for Halloween?
To make your own face paint, combine equal parts of cornstarch, coconut oil, and food coloring. Mix thoroughly until smooth and use as needed!
Which face paint is easy?
Water-based face paints are generally considered the easiest to work with, thanks to their effortless application and removal. They are also readily available and come in various colors.
Conclusion: Enjoy Your Halloween with Easy Face Paint
In conclusion, easy face paint for Halloween not only allows you to express creativity but also helps you transform your look without complicated techniques. By following the tips outlined in this article, you can achieve impressive, stylish designs that are sure to wow your friends and family.
Choosing the right products, exploring creatively simple designs, and mastering application techniques will prepare you for a fun Halloween experience. Enjoy the festivities, unleash your creativity, and have a spooktacular time!