The story of Little Red Riding Hood is one that has been passed down through generations, captivating audiences with its blend of whimsy and cautionary themes. While many remember the tale of a young girl on a journey through the woods, the character of Red Riding Hood also symbolizes independence, bravery, and femininity. Over the years, the classic red cloak and basket have transformed into a popular costume choice, particularly for adults who want to pay homage to a beloved fairy tale while adding their unique twist. Crafting a DIY Red Riding Hood costume allows for creativity, personal expression, and the chance to stand out at any costume party or Halloween gathering.
In this comprehensive guide, we’ll explore every aspect of creating a DIY Red Riding Hood costume for adults, including essential materials, style variations, detailed step-by-step crafting instructions, accessories, makeup ideas, and tips for showcasing your costume. By the end of this article, you’ll be fully equipped to embody the enchanting spirit of Red Riding Hood while adding your personal charm to the iconic look.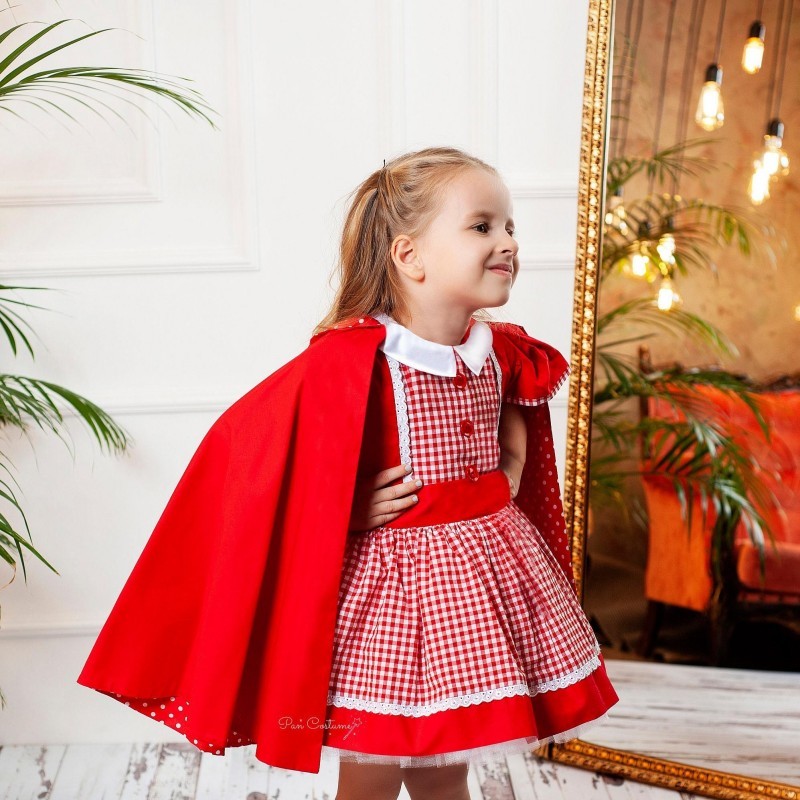
Contents
- 1 The History of Little Red Riding Hood
- 2 Essential Materials for Your DIY Red Riding Hood Costume for Adults
- 3 Step-by-Step Instructions for Creating Your DIY Red Riding Hood Costume
- 4 Tips for Personalizing Your DIY Red Riding Hood Costume
- 5 Showcasing Your DIY Red Riding Hood Costume
- 6 Conclusion: Bringing the Story of Little Red Riding Hood to Life
The History of Little Red Riding Hood
Before diving into costume creation, it’s helpful to understand the origins and evolution of the Little Red Riding Hood story. The history can inform your costume design choices and deepen your appreciation for this iconic character.
- Origins of the Tale: Little Red Riding Hood originated in folklore and has roots dating back to the 10th century. Various versions of the story exist in different cultures, but the most recognized form was popularized by the Brothers Grimm in the 19th century.
- Story Summary: In the classic narrative, a young girl, referred to as Little Red Riding Hood, sets off to visit her sick grandmother. On her journey through the woods, she encounters a sly wolf who devises a plan to reach the grandmother’s house first. The story unfolds with a mix of danger and naive curiosity, ultimately leading to various resolutions depending on the version.
- Symbolism: Little Red Riding Hood can be seen as a symbol of innocence and the journey from childhood to adulthood. The transition through the woods represents the challenges of adolescence, while the wolf embodies the threats that lurk in the depths of the unknown.
- Cultural Impact: Over the years, Little Red Riding Hood has been interpreted in countless ways through literature, film, art, and fashion. This enduring relevance makes the character a beloved choice for costume representation.
Understanding the history behind Little Red Riding Hood will not only deepen your connection with the character but also help you craft a costume that honors this timeless tale.
Essential Materials for Your DIY Red Riding Hood Costume for Adults
To create the perfect DIY Red Riding Hood costume for adults, gathering the right materials is crucial. Here’s a detailed list of what you will need:
- Red Cloak or Cape: The centerpiece of your costume is, of course, the iconic red cloak or cape. You can either purchase a pre-made cloak or create your own using red fabric like fleece, satin, or cotton. Make sure it has a hood for that classic look.
- Dress or Skirt: Underneath the cloak, wear a cute dress or skirt that aligns with your desired look. Choose a design that embraces fairy tale aesthetics, traditionally featuring gingham patterns, floral prints, or solid colors.
- Layering Top: If the weather is chilly, consider adding a white blouse or a fitted long-sleeve shirt underneath your dress. Alternatively, a lace bodice can provide a charming, vintage touch.
- Footwear: Choose shoes that match your character’s style. Opt for black Mary Janes, ankle boots, or even knee-high socks to enhance the fairy tale-like quality. Pick a comfortable pair that allows for movement while still looking stylish.
- Accessories: Consider adding a basket to carry as a nod to Red Riding Hood’s journey. You can also include other props that represent the story, like a faux loaf of bread or some flower petals.
- Wig or Hair Accessories: If your hair color doesn’t match Little Red Riding Hood’s traditional look, consider a vibrant, long red wig. Alternatively, you can add cute hair accessories like bows or ribbons.
- Makeup Supplies: Stock up on makeup essentials that can help you complete the character look. This includes foundation, blush, lipstick, and eye shadow that emphasize a playful, youthful appearance.
With these materials in hand, you will be well-prepared to embark on your costume-making journey.
Step-by-Step Instructions for Creating Your DIY Red Riding Hood Costume
Now that you have gathered all the necessary materials, it’s time to dive into crafting your DIY Red Riding Hood costume. Follow these step-by-step instructions for a streamlined process.
Crafting the Cloak or Cape
- Choosing the Fabric: Based on your preference for materials, select a vibrant red fabric that fits your style—whether it’s cozy fleece for warmth or lightweight satin for a touch of elegance.
- Measuring and Cutting: Measure the length needed for your cloak, ensuring it reaches approximately mid-calf or the desired length. Add extra fabric for sewing hems or adding a hood. Cut a rectangular piece to achieve the cloak shape.
- Adding the Hood: To create a hood, cut an additional piece of fabric that can be shaped into a pointed or rounded hood. This will typically be a triangle shape that drapes comfortably over your head. Sew or attach it securely to the cloak.
- Finishing Edges: Hem the edges of the cloak using a sewing machine or fabric glue to prevent fraying. If using a heavier fabric, consider double-folding the hems for added durability.
- Trial Fit: Once the cloak is assembled, try it on to check the fit. Make any necessary adjustments to ensure it stays comfortably in place.
Assembling the Dress or Outfit
- Selecting Your Dress: Choose a dress or skirt that complements the cloak. If you opt for a dress, look for classic styles that align with fairy tale themes, such as a fitted waist and flared skirt.
- Layering Options: If desired, layer your dress with a fitting blouse or lace for added depth. This can be a great way to add texture and engage with the dreamy aesthetic of the character.
- Personalization: Consider adding small embellishments to your dress or skirt, like a decorative belt, bows, or lace trim. This adds uniqueness to your costume while capturing the essence of Red Riding Hood.
- Footwear Selection: Select shoes that are comfortable and stylish. Black Mary Janes can enhance the vintage look, while ankle boots add an edge. Ensure they’re suitable for walking or dancing.
Adding Accessories
- Creating the Basket: If you want to recreate the iconic visual, find a small wicker basket that fits comfortably in your hand. You can line it with a red cloth or fill it with faux baked goods or flowers for added charm.
- Additional Props: Consider incorporating other props that connect to the story. Items like a small faux wolf toy could add a whimsical touch to enhance the thematic experience.
- Hair Accessories: Style your hair to match the character. If using a wig, secure it well. Alternatively, add a hairband, bows, or ribbons that coordinate with the color palette.
- Makeup Application: Once your outfit is on, apply makeup that complements your Red Riding Hood character. Use soft colors to create a natural look. A touch of rosy blush, a hint of color on your lips, and brightening eye shadow can imitate Red Riding Hood’s innocent and youthful appearance.
With these steps, your DIY costume will come together beautifully, allowing you to be the perfect embodiment of Little Red Riding Hood.
Tips for Personalizing Your DIY Red Riding Hood Costume
A DIY Red Riding Hood costume provides an excellent canvas for personal expression. Here are some tips on how to make your costume unique:
- Play with Color: While traditional depictions feature a red cloak, consider switching it up. Explore dresses and cloaks in alternative colors, such as deep burgundy, pastel shades, or even patterns to create a fresh take.
- Incorporate Modern Elements: Blend modern fashion with traditional elements. This could include pairing your dress with trendy sneakers or stylish accessories that give a contemporary edge to the look.
- Opt for Layering: Explore the layering of cloaks and dresses to create a distinctive appearance. Combining different lengths and fabrics can add dimension to your costume.
- Creative Accessories: Utilize costumes as an opportunity to showcase creativity. Consider adding unique elements, such as themed jewelry, statement socks, or even a faux animal print to represent the wolf.
- Collaborate with Friends: If you have friends who enjoy dressing up, consider creating group costumes. Having a mix of characters from the fairy tale can create a lively atmosphere.
By infusing your personality into the design process, your DIY Red Riding Hood costume will be truly one-of-a-kind, leaving a lasting impression.
Showcasing Your DIY Red Riding Hood Costume
Once your DIY Red Riding Hood costume is complete, it’s time to show it off! Here are some fun ways to display your costume:
- Halloween Parties: Halloween is the perfect occasion to showcase your creativity and charm. Attend parties and embrace the whimsical nature of your outfit, engaging with fellow attendees.
- Themed Events: Keep an eye on local events featuring themes related to fairy tales, literature, or fantasy. Your costume would be an ideal fit for any gathering focused on these subjects.
- Cosplay Conventions: Join cosplay conventions or events celebrating literature and storytelling. Sharing your costume with other fans can foster connections with those who appreciate the character.
- Photo Opportunities: Plan a fun photo shoot in your costume. Find scenic backdrops that resonate with the fairy tale aesthetic, such as forests or parks where you can immerse yourself in the story.
- Social Media Sharing: Document your costume journey and promote your final product on social media platforms. Celebrate your creativity and connect with others who admire your work.
By participating in these opportunities, you can relish the joy of dressing as Little Red Riding Hood while creating unforgettable memories with fellow fans.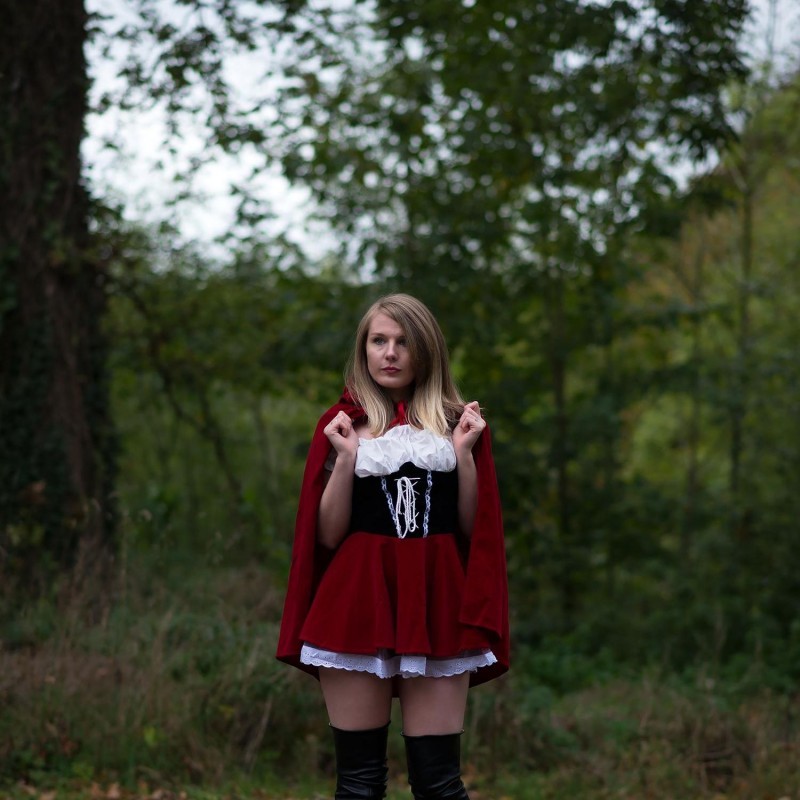
Conclusion: Bringing the Story of Little Red Riding Hood to Life
Crafting a DIY Red Riding Hood costume is not just about fabric and accessories; it represents a connection to timeless stories that have enchanted audiences for generations. Through this comprehensive guide, you’ve explored the origins of Little Red Riding Hood, gathered essential materials, followed step-by-step instructions, and learned how to personalize your costume. Embracing your creativity while paying homage to this classic character allows you to become part of a cherished narrative, capturing the essence of Red Riding Hood in your unique way.
As you prepare for upcoming events, let your costume tell your story while celebrating the beauty of fairy tales. Enjoy the experience of assembling the costume, delving into the details that make it unique. Whether you’re attending a Halloween party, cosplay event, or simply sharing the love for classic literature, your DIY Red Riding Hood costume showcases your artistic expression and offers a chance to connect with fellow enthusiasts.
So gather your materials, immerse yourself in the character, and get ready to step into the enchanting world of Little Red Riding Hood. May your costume create unforgettable memories, spark conversations, and remind everyone of the timeless tales that continue to inspire us.