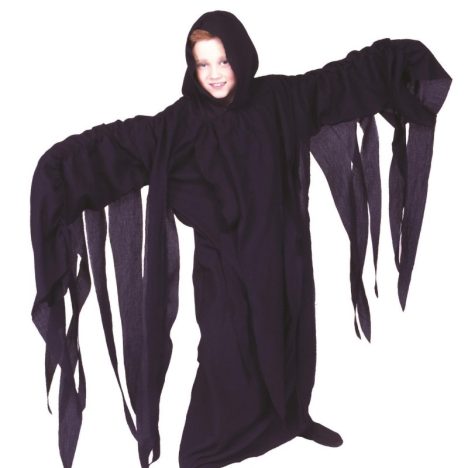
Dementors are among the most iconic figures in the Harry Potter universe, characterized by their chilling presence and ability to invoke feelings of despair. These dark creatures have captivated fans’ imaginations, making them a popular choice for costumes, especially during Halloween or themed events. If you want to make a statement and terrify your friends, assembling a DIY Dementor could be the perfect project. Not only does it allow for creativity and artistic expression, but crafting your own costume can also be a fun and rewarding experience. In this comprehensive guide, we’ll take you through the entire process of creating your DIY Dementor costume, from gathering materials to crafting individual components, styling, and accessorizing. By the end of this article, you’ll be equipped with all the knowledge necessary to bring this haunting character to life.
Contents
- 1 Understanding the Character: The Significance of Dementors
- 2 Essential Materials for Creating Your DIY Dementor
- 3 Creating the Wire Frame for Your DIY Dementor
- 4 Crafting the Cloak for Your DIY Dementor
- 5 Creating the Face of the DIY Dementor
- 6 Painting and Texturing Your DIY Dementor
- 7 Completing the DIY Dementor with Accessories
- 8 Showcasing Your DIY Dementor Costume
- 9 Final Thoughts: Bringing Your DIY Dementor to Life
Understanding the Character: The Significance of Dementors
To accurately create a DIY Dementor, it’s essential to understand the character’s background and symbolic meanings within the Harry Potter series. This insight will inform design choices and help you capture the essence of this haunting creature.
- Origins of Dementors: Dementors were introduced in “Harry Potter and the Prisoner of Azkaban,” where they are depicted as the grim guards of Azkaban, the wizarding prison. Their primary role is to guard prisoners and extract happiness from others, leaving only despair.
- Physical Appearance: Dementors are often described as tall, hooded figures with skeletal features. Their dark robes seem to flow and float rather than adhere to form, enhancing their ethereal presence.
- Symbolism of Depression: The portrayal of Dementors serves as an allegory for depression and anxiety, making them relatable for many readers. Their ability to suck the happiness out of people reflects real-life struggles that individuals face.
- The Patronus Charm: The only defense against a Dementor is the Patronus Charm. This raises the idea of positive memories acting as a shield against darkness, emphasizing themes of hope and resilience.
Understanding these aspects of Dementors not only provides context for your costume but also enhances the character’s representation in your DIY process.
Essential Materials for Creating Your DIY Dementor
Crafting a DIY Dementor requires a variety of materials to ensure you can accurately replicate its iconic features. Below is a comprehensive list of essential items you’ll need:
- Fabric: Use dark fabric like black or deep gray tulle, felt, or another lightweight material to create the flowing cloak. Consider a fabric that has some drape to mimic the ethereal quality of a Dementor.
- Wire Frame: A sturdy wire frame will help you achieve the desired structure for your Dementor. This can be crafted from thicker wire to form the body and limbs.
- Foam or Padding: Utilize foam or batting to create the skeletal structure of the head, hands, and body. This padding will give your Dementor a haunted appearance, ensuring it looks terrifying.
- Paint: Black, gray, and dark green acrylic paints will effectively add depth and texture to the costume. Use a combination of shades to highlight and shadow different areas.
- Hot Glue Gun and Sticks: A hot glue gun will serve as your primary bonding tool. Ensure you have a sufficient supply of glue sticks for attaching fabric, wire, and props.
- Scissors: A reliable pair of scissors will be necessary for cutting fabric, wire, and any additional materials.
- Sewing Supplies: A needle and thread (optional) may be needed if you prefer stitching elements together instead of solely relying on glue.
- Elastic Bands or Ties: To secure the cloak to your body, consider using elastic bands or ties to keep the fabric in place.
- Face Mask or Head Base: If you plan to create a wearable Dementor costume, you’ll need a mask or a base upon which to craft the facial features.

With these materials ready at hand, you can embark on creating your DIY Dementor with ease.
Creating the Wire Frame for Your DIY Dementor
The first step in crafting your DIY Dementor is to build a sturdy wire frame. This frame will serve as the foundational structure for your costume, allowing it to maintain its shape and stability.
- Designing the Frame: Start by cutting lengths of wire to form the main body, arms, and head of the Dementor. Aim for a height that allows your creature to appear imposing while accommodating your personal size.
- Constructing the Body: Begin by twisting sections of wire together to create a simple humanoid shape. Make sure the base is sturdy while keeping the limbs flexible for later adjustments. Pay special attention to joints; ensure they can bend to promote ease of movement.
- Adding Arm Extensions: For a more dramatic appearance, extend the arms outwards using longer wires. Bend the ends to form claw-like fingers, enhancing the sinister aesthetics of the Dementor.
- Creating Height and Width: To give your Dementor more presence, consider sculpting an exaggerated head and upper body. A larger headpiece can evoke a more eerie appearance that will stand out.
- Testing Stability: Stand the frame upright and adjust if necessary. Make sure it can support the weight of the fabric cloak and any additional features along the way.
By constructing a stable wire frame, you’ll have the structure needed to support the rest of your DIY Dementor, ensuring that it retains an impressive presence and enhances the overall effect of your costume.
Crafting the Cloak for Your DIY Dementor
The cloak is a signature element of the Dementor’s appearance, and creating a flowing, dramatic effect will bring your costume to life. Follow these steps to craft the perfect cloak:
- Cutting the Fabric: Measure the height of your wire frame and cut pieces of fabric that are long enough to reach the ground, allowing them to drape dramatically. Aim for lengths that taper at the base to create a billowing effect.
- Creating the Hood: The hood is essential for mimicking the Dementor’s recognizable silhouette. Fold a portion of fabric in half and cut a semicircle at the top edge. This will create a rounded shape that can fit comfortably over the frame’s head.
- Sewing or Gluing Edges: If you choose to sew, consider hemming the raw edges to prevent fraying. Alternatively, use fabric glue to keep the edges secure.
- Attaching the Cloak to the Frame: Drape the fabric over the wire frame, allowing it to flow naturally. Secure the top of the cloak to the wire frame using glue or by wrapping fabric around it. Make sure the cloak drapes appropriately over the upper body and shoulders.
- Adding Textural Details: For a ghostly appearance, consider layering different fabrics. Adding sheer layers or shredding the bottom of the cloak can create an eerie effect to enhance the overall presentation.
By skillfully crafting the cloak, you will provide your DIY Dementor with depth and movement, making it visually captivating and aligning closely with the source material.
Creating the Face of the DIY Dementor
The face plays a crucial role in portraying the essence of a Dementor. Here’s how to create a hauntingly effective face for your costume:
- Forming the Base: Utilize a plastic mask, foam, or a crafted headpiece that can be attached to the wire frame. This will serve as the foundation for creating facial features, ensuring it fits securely.
- Adding Eyes: Create hollow eye sockets to mimic the Dementor’s distinctive gaze. You can achieve this by cutting holes in the base or painting a dark visage to give off an empty look. For added effect, cover the eyeholes with a layer of black mesh fabric to enhance the haunting vibe.
- Crafting the Mouth: Cut a gaping mouth to reflect the character’s chilling expression. The mouth can be a simple opening that is surrounded by darker fabric or paint to imitate a sinister grin.
- Texturing the Face: Use paint to create shadows and dimension on the face. Gray and black shades can enhance the look of decay and create a more lifelike representation. Use sponges to dab on different paint tones, adding depth to achieve a weathered effect.
- Attaching the Face to the Frame: Secure the face to the wire frame using glue or wire ties. Ensure that it aligns well with the rest of the costume and feels stable.
By focusing on these details, you can craft a face that embodies the cunning and chilling nature of a Dementor, enhancing the overall aesthetic of your DIY project.
Painting and Texturing Your DIY Dementor
Once you have assembled the basic structure and components of your DIY Dementor, the next step is painting and adding texture to achieve a haunting appearance:
- Prepping for Painting: Before applying paint, ensure all surfaces are clean and free of dirt. This ensures better adhesion and an even final finish.
- Choosing Paint Colors: Select colors typical of Dementors, which include dark grays, blacks, and muted tones. You may also consider metallic shades for certain highlights to give depth.
- Painting the Cloak: Use spray paint or acrylics to apply color to the cloak. Focus on darker shades at the bottom and use lighter shades for highlights, creating an illusion of movement.
- Creating Texture Effect: To add more life into your Dementor, consider dry brushing lighter colors on the cloak’s surface. This technique adds dimension and mimics the ethereal quality of the character.
- Facial Feature Painting: Paint the face using the same color scheme, ensuring that shadows fall according to the shape you’ve crafted. Mix black, gray, and an occasional touch of white for highlights; this will create a dimensional appearance that enhances the overall effect.
- Final Review: Once the painting is finished, review the entire costume. Ensure the colors transition smoothly and make any necessary touch-ups to enhance the final appearance.
By applying paint thoughtfully, you can effectively give your DIY Dementor a chilling and lifelike quality, enhancing its presence as a fearful entity.
Completing the DIY Dementor with Accessories
The final touch to creating a truly memorable DIY Dementor is to incorporate accessories that align with its identity. Consider the following ideas to enhance your character portrayal:
Ideal Accessories for the Cloak
- Ghostly Props: Consider carrying props that resonate with the theme of sadness and fear. A faux heart or soul could provide a dramatic touch connected to the Dementor’s ability to suck happiness from others.
- Ethereal Lighting: Adding small battery-operated LED lights, either under the cloak or in the eyes, can create an otherworldly effect, especially in darker settings.
Putting Together Finishing Details
- Worn Appearance: Consider distressing the fabric by lightly shredding the edges or using scissors to create a tattered look. This reflects the aged, decayed quality of a Dementor.
- Dynamic Movement Elements: Attach lightweight fabrics or tulle to the arms or bottom of the cloak. This will create an eerie, flowing effect as you move, enhancing the sensory impact for those who encounter your DIY Dementor.
- Practical Considerations: Make sure all accessories are safely attached to prevent any parts from falling during wear. This is particularly important for props that may distract or diminish the overall effect.
By thoughtfully completing your DIY Dementor costume with these accessories, you can elevate your portrayal to a new level, making a significant impression on anyone who sees your creation.
Showcasing Your DIY Dementor Costume
Now that your DIY Dementor costume is complete, it’s time to showcase your hard work and creativity at various events. Consider these options for spotlighting your stunning creation:
- Halloween Gatherings: Halloween remains the perfect occasion for any spooky costume. Embrace the spirit of the event by donning your Dementor costume at parties, creating eerie yet enchanting interactions.
- Themed Roles in Cosplay: If you’re participating in cosplay conventions, your DIY Dementor will be a fantastic addition to themed events. Engage with fellow fans and share your love for the series through character portrayals.
- Charitable Events: Consider using your DIY costume for charitable events or community gatherings. Whether scaring up fun for a good cause or supporting storytelling initiatives, your presence as a Dementor can draw attention to meaningful conversations.
- Photo Opportunities: Create memorable photo sessions with your DIY costume. Choose scenic backgrounds that enhance the spooky aesthetic and capture memorable moments in your creation.
- Social Media and Sharing: Share images of your costume on social media platforms, inviting friends and followers to see your finished work. Connecting with others interested in crafts and storytelling can also inspire collaborative future projects.
Taking these steps to showcase your DIY Dementor can lead to memorable experiences and foster community engagement with fellow fans.
Final Thoughts: Bringing Your DIY Dementor to Life
Creating a DIY Dementor costume is not just about assembling materials; it’s about crafting a connection to the rich narrative within the Harry Potter universe. By following this comprehensive guide, you’ve learned how to build a character grounded in symbolism while allowing your imagination to flourish. Each step—from understanding character traits and constructing the wire frame to painting and accessorizing—contributes to your final masterpiece.
As you finalize your DIY Dementor, embrace the time and creativity you invested in this project. Whether displaying your costume at Halloween or giving it life at a convention, you’ll not only embody a memorable character but also foster connections with fellow fans who appreciate the magic of storytelling and creation.
So gather your materials, unleash your creativity, and enjoy every moment of the building process. With your DIY Dementor complete, you’re all set to enchant, scare, or impress anyone who crosses your path. Happy crafting!